- After Installing the Main Game
After Installing the Main Game
Understanding your EQClient.ini
The eqclient.ini file contains a list of settings that can be changed to suit your preferences, many of which cannot be changed in-game through the options window.
In Windows, the eqclient.ini is located within your EverQuest directory, wherever eqgame.exe resides.
Some commonly changed settings include:
- WindowedMode=TRUE/FALSE - This line must be typed out at the top but below [Defaults]. Most users on Quarm run in windowed mode and will ALT+Enter to fullscreen. Recommended set to TRUE
- NewUI=TRUE/FALSE - Our client still has the old pre-Luclin UI for nostalgia mode. Recommended set to TRUE
- OldUI=TRUE/FALSE - This may be optional as it’s not found in everyone’s .ini. This in combination with the previous NewUI, should enable/disable the original “Stone UI”. Recommended set to FALSE
- Log=TRUE/FALSE - Setting this true will automatically turn your log file on when entering the game. Set to FALSE by default. Still seems to create chat logs though.
- CombatMusic=TRUE/FALSE - Enable or disable melee combat music.
- ChannelAutoJoin=alliance - The Alliance channel is used as the global chat channel for the server.
- ChatKeepAlive=1 - Keeps the above chat channel from disconnecting by periodically sending communication to it.
- TargetGroupBuff=1 - This will allow you to buff groups with group buff spells from outside the group by targeting a member of the group. Default set to 1
- AttackOnAssist=FALSE - This will allow you to assist another player without automatically enabling auto attack.
- MaxFPS= - This is the framerate you limit the foreground client window to. If this is set too high, it may consume too many system resources. Typically 60 is a good number to start with and adjust if necessary. A setting of 0 disables the limit.
- MaxBGFPS= - This is the framerate you limit the background client windows to. You don’t want this too low, since it will affect autofollow ability. But, if you have it too high, it may consume too many system resources. 60 is typically good. A setting of 0 disables the limit.
- MouseRightHanded=1 - Switches mouse button orientation.
- MaxMouseLookFPS= - Allows you to set the mouselook FPS to help with mouselook slowness. If your mouselook is too slow, try adjusting this to 60 or 45. A setting of 0 disables the limit.
- AllLuclinPcModelsOff=TRUE - This disables Luclin models. This also allows use of the famous horse bug that existed on AK where you don’t have the limitations of horse speed up/down that you do with Luclin models on.
- UISkin= - Sets your default UI skin. I changed this value and it did nothing. Change in game.
-
TextureCache=FALSE - 2025 Update This value should be set to FALSE to avoid graphic issues when using the latest server patch files.
-
Velious armor textures:
- AllLuclinPcModelsOff=FALSE
- LoadVeliousArmorsWithLuclin=TRUE
- LoadArmor17=TRUE
- LoadArmor18=TRUE
- LoadArmor19=TRUE
- LoadArmor20=TRUE
- LoadArmor21=TRUE
- LoadArmor22=TRUE
- LoadArmor23=TRUE
Velious armor textures are not enabled by default as they can cause an issue with Vah Shir armor not displaying. Most players would probably prefer them on however. Source: wiki.takp
There are some other flags that seem to be unique to Project Quarm Source: #tech-help. Some of these will only appear if you’re using the latest .dll and only after logging into the game once.
- EnableBrownSkeletonHack=FALSE - We had problems getting the correct skeleton models at first and some people like the brown ones. You can set this to TRUE or you can go find skeleton model replacements under Part 3.
- EnableExtendedNameplateDistance=TRUE - Added after the 10/8/2023 .dll update that extended the nameplate distance.
- EnableClassicMusic=FALSE - Changes the music from old to new.
Zeal also has a number of eqclient.ini values that are saved here and this list will likely grow over time.
- MouseSmoothing=TRUE - This fixes the jittery 3rd person camera movement that is exclusive to the TAKP client. The mouse sensitivity values below are all extensions of this. Make sure they’re never set to 0 or else your camera will not move on that axis.
- MouseSensitivityX=0.300000
- MouseSensitivityY=0.300000
- Fov=45.000000
- ChatTimestamps=TRUE - Zeal feature that adds chat timestamps in HH:MM:SS.
- MouseSensitivityX3rd=0.300000
- MouseSensitivityY3rd=0.300000
- Camera3StrafeEnabled=TRUE
- Camera4StrafeEnabled=TRUE
- PanDelay=20
- CycleToZealCamEnabled=TRUE
- Bluecon=TRUE - When a mob cons dark blue the text is difficult to read on a black background. This will add a new value to the Options - Color tab with a value of 70.
- ZealInput=TRUE - toggles the zeal input setup for any input in game, giving you a more modern input (ctrl+c, ctrl+v, left, right, shift left+right for highlighting, home, end ect).
- LeftTurnSpellbookAutostand=FALSE
- RightTurnSpellbookAutostand=FALSE
- NetstatVisibilityState=TRUE
- LeftStrafeSpellbookAutostand=TRUE
- RightStrafeSpellbookAutostand=TRUE
- PanDelay=20 - Zeal adds the ability to left click and hold to move the camera in 3rd person without moving the character. To prevent misclicks, you can add a delay to this functionality.
Display Settings
You’ll want to set your width and height to match your monitor’s native resolution, and Windows is often already set this way. If you right click your desktop on Windows 11 and choose Display Settings, you should see your Display Resolution. This is the width x height you want to set your eqclient.ini values to as seen below.
Most modern monitors display an aspect ration of 16:9 and if your settings do not match this ratio, your game will look squished or stretched. By setting the resolution to a ratio that matches your monitor, the image should look correct and easier to read.
- [VideoMode]
- Width=1920
- Height=1080
- RefreshRate=60
-
(match your display settings with the proper height and width prior to launching the game)
- [Options]
- MaxFPS=60 - These are similar to the ones above. Your goal is to set them as high as you can to match your display’s refresh rate.
- MaxBGFPS=60
- MaxMouseLookFPS=60
- WindowedMode=TRUE
- MouseRightHanded=1
- NoFPSLimiter=0 - This option will only work with the very latest experimental .dll and this is half the fix for the 3rd person stutters you previously experienced in older versions of Quarm. SET TO 0
Some users may have ultra wide monitors and prefer to play in a 16x9 aspect ratio even though their monitor does not match this. You can use something called ViewPort settings to change the aspect ratio of your game. This would allow you to display the game in 16x9 but with black bars on the left and right sides of your screen, allowing you to put maps or timers in those areas. You can find some detailed instructions on viewports here.
Controlling your User Interface
The supported client comes with several additional custom UIs. To switch to one of these, run the slash command /loadskin <ui> 1. The 1 is optional– it will keep your current window positions. Loading UIs via the options window will not work. Source: wiki.takp
There are several sources to download new User Interface packages, such as qqui Calmethar, eqinterface.com, or from #ui-discussion. Just make sure to check the date and description for Zeal additions.
How Do I install an Interface?
-
Download your chosen interface.
-
Find the folder in your EverQuest directory UIFILES inside there will be a folder Default*.
-
Create another folder beside Default, for our example we will call it “BARD” (You can not have spaces in the name). If the file you downloaded already contains a folder, you should skip this step.
-
Unzip all of the files from your download into the folder “BARD”
-
Login to EverQuest. In game, type
/loadskin BARD. This will select the BARD UI and load it. The screen will look like your zoning for a moment, then load your new UI modifications. Typing/loadskin BARD 1, the 1 is optional– it will keep your current window positions. Press ALT + O to open the options menu. Navigate to General and select Load UI Skin. SelectBARDfor now and click Load Skin.
The default folder CAN NOT be altered in any way. Any changes made to this folder are overwritten at start up of the game.
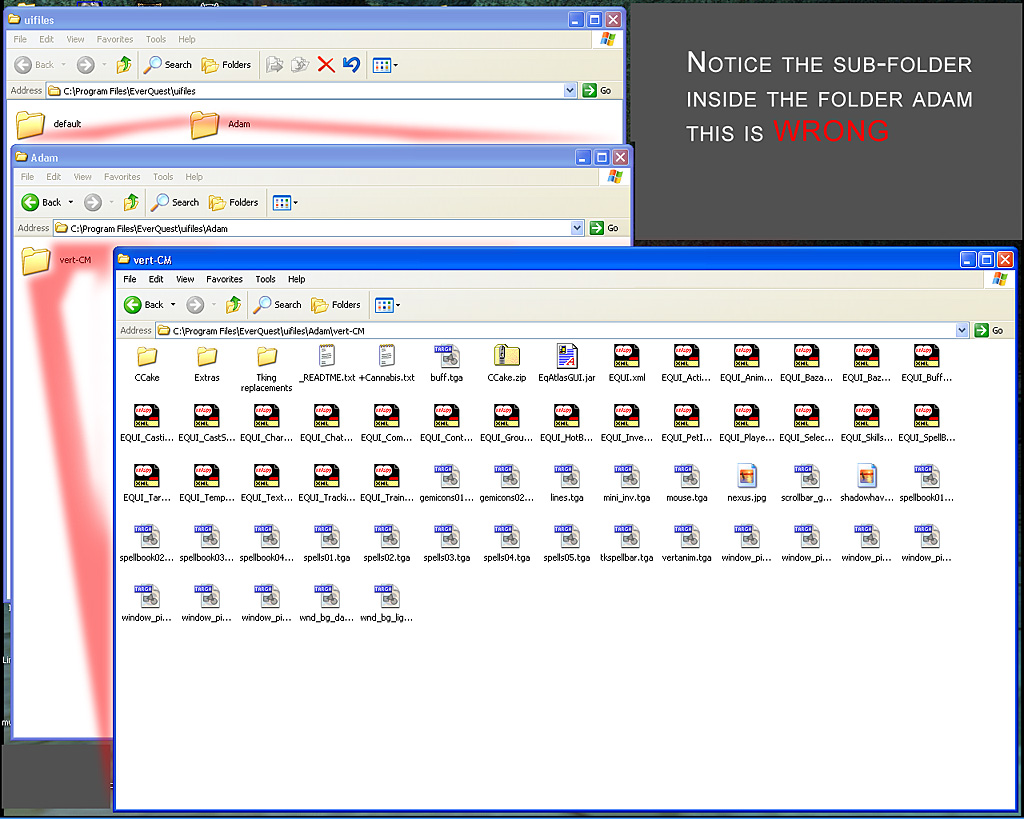
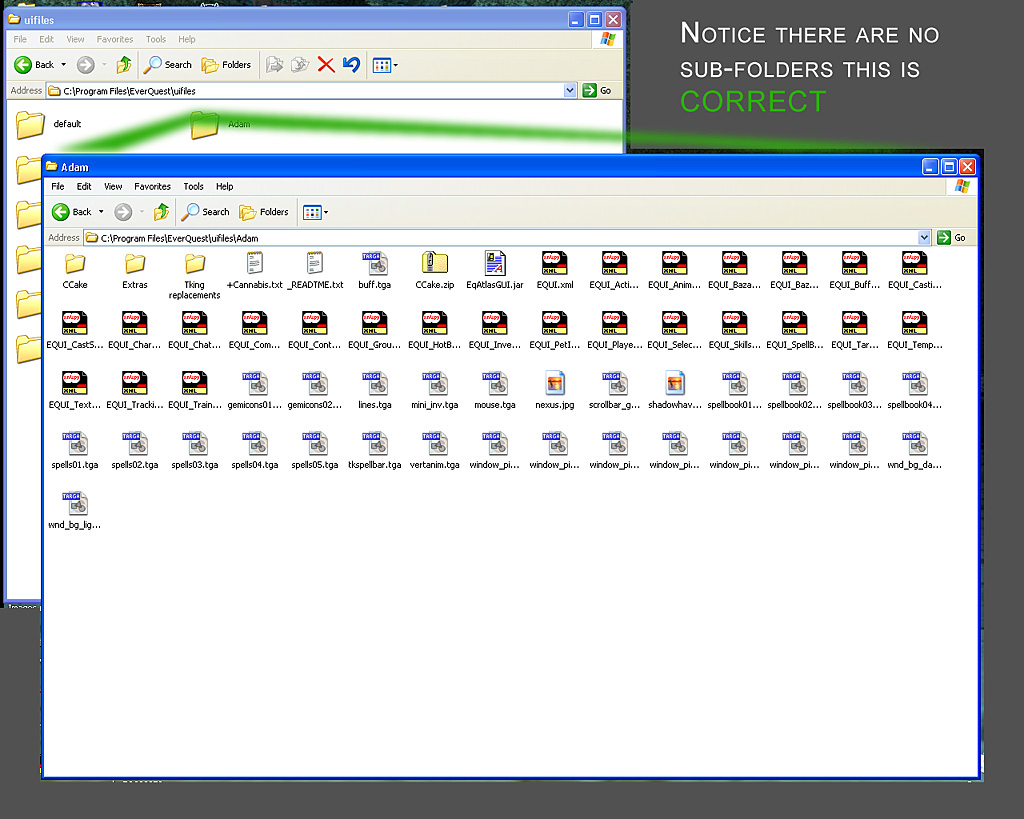
Where should my files be saved?
They should be saved in a single level folder. One of the most common reasons that UIs wont load is that there is a sub-folder inside the Custom UI Folder. Here are two pictures, one showing the wrong way, and one showing the correct way.
Duplicating your UI Settings for New Characters
Inevitably you’ll create multiple characters during your time on Project Quarm. However you do not have to choose a UI and move every window for each character. You can easily copy all of your UI positions by understanding your UI log files. In your TAKP folder you will find files with the naming convention UI_charactername_pq.proj.ini. If you identify the one for your main character, the one who has their UI set and all the window positions perfect, you can simply make a copy of this file and rename it to the name of your second character. When you log into the new character, your UI and window positions should now match your first character.
UI_Xanax_pq.proj.ini Copy, Paste UI_Xanax_pq.proj - Copy.ini rename to UI_Xantagonist_pq.proj.ini
Where to get Quarm User Interfaces
Its tricky searching around Project Quarm’s Discord but I can provide a list that will get you started.
- defaultUI
- DuxaUI 1080p
- DuxaUI
- Nillipuss UI 1080p
- Nillipuss UI 1440p
- qqui Calmethar Edition - eqinterface.com
- Lunakin Quarmified - A custom colorful UI for Project Quarm
- Murmurs / Franken UI - ui-discussion
- Qrustle
- Custom Nillipus Setup Newborn - ui-discussion
- LeeWong’s Custom UI’s Black Edition - ui-discussion
- EQ Graphics Overhaul Project - ui-discussion
-
QQUI Velious UI Edit p99 - ui-discussion
- Other Quarm UIs from EQInterface - EQ Interfaces for Quarm TAKP/P2002
Characters, Logs, Spell Sets, and Screenshots
Character ini for Friends Abilities Socials and Macro Settings
The above file duplication and renaming trick we used with our UI settings can be used for other saved settings as well. charactername_pq.proj.ini contains all of your friends, ignore, abilities, combat skills, and social macros. Any time you make a new character, you should consider duplicating this file as well and renaming the copy to your new character. The ability and macro copying is a mixed bag, but it’s important not to lose your friends.
Chat Logs
Everything you see in your chat windows is written to a log file in your TAKP folder. Back in the original EQ days we would delete this every month because the file would get big and make the game act up. Everything you see in this file, the CSR team for Project Quarm can also see and is likely being logged on their end. eqlog_charactername_pq.proj.txt is the file that all your chat logs are written to. This can be helpful if you need to pull historical chat conversations, for example.
Spell Sets
Zeal has added the ability to make spell sets. Commands in game are as follows:
/spellset
- Arguments: save, load, delete
- Example: /spellset save buffs
- Example: /spellset load buffs
- Example: /spellset delete buffs
- Description: allows you to save and load spell sets
Once created, you can even right click your spellbook to choose one of your spell sets from a drop down menu. These values are saved in a new file called charactername_spellsets.ini. Within these you can then rename your spellsets or duplicate the file for someone playing the same class as you, for example.
Screenshots
Screenshots can be taken by pressing PRINT SCREEN within the game, and can be changed within the Options. These are saved in your TAKP folder as EQ000001.bmp for example.
Nameplate Fonts
Nameplate Fonts are a feature of Zeal. From Zeal Options, select Nameplate and enable “Zeal fonts”. Below you can use the drop down to select different nameplate fonts. From the Zeal Readme:
Nameplate Options Setup and configuration
Zeal includes options for players to adjust Player Nameplates and NPC Nameplates in game. In addition, Skeletons now show a Nameplate. (Client Skeleton Nameplate Bug Fix) Necromancers will now have an easier time finding their corpses.
The nameplate is controlled through three interfaces:
Dedicated Zeal options window tab (requires zeal\uifiles, see Installation notes above)
Key binds for nameplate options (configure in EQ Options->Keyboard->Target)
The /nameplate commands described below
Enabling Disabling Nameplate Options
The Zeal Nameplate options tab is the primary interface, but the redundant commands below are available:
/nameplate colors - Toggles Nameplate Colors for Players on and off
/nameplate concolors - Toggles Nameplate Con Colors for NPCs on and off
/nameplate hideself - Toggles Player Nameplate on and off
/nameplate x - Toggles Player Nameplate as X on and off
/nameplate hideraidpets - Toggles Raid member Pets Nameplate on and off
/nameplate showpetownername - Toggles Players Pet Owner on Nameplate on and off
/nameplate charselect - Toggles Nameplate Choices Shown at Character Selection Screen on and off
/nameplate targetcolor - Toggles Target Nameplate Color on and off
/nameplate targetblink - Toggles blinking of target nameplate on and off (rate controlled by targetring slider)
/nameplate attackonly - Limits blinking of target nameplate to only when auto-attack is on
/nameplate targetmarker - Toggles Target Nameplate Marker on and off
/nameplate targethealth - Toggles Target Nameplate Health on and off
/nameplate targethealth - Toggles Target Nameplate Health on and off
/nameplate inlineguild - Toggles guild name appearing inline or on a separate line
/nameplate zealfont - Toggles internal client or custom Zeal fonts
/nameplate dropshadow - Toggles drop shadowing on Zeal fonts
Changing the Color of Nameplates
Zeal allows players to change the colors of the Nameplates of Players and NPCs in game. The Color Selector is available in the Zeal Colors Tab of the Zeal Options menu. The following 19 Nameplate Colors can be changed to custom colors.
AFK, LFG, LD, MyGuild, Raid, Group, PVP, Roleplay, OtherGuilds, DefaultAdventurer
NPC Corpse, Player Corpse, GreenCon, LightBlueCon, BlueCon, WhiteCon, YellowCon, RedCon, Target Color
Default Colors of Nameplates when using Nameplate Colors system
1 - AFK - Orange
2 - LFG - Yellow
3 - LD - Red
4 - MyGuild - White Red
5 - Raid - White Light Purple
6 - Group - Light Green
7 - PVP - Red
8 - Roleplay - Purple
9 - OtherGuilds - White Yellow
10 - DefaultAdventurer - Default Blue
11 - Npc Corpse - Black
12 - Players Corpse - White Light Purple
13 - Green Con NPCs - CON_GREEN
14 - LightBlue Con NPCs - CON_LIGHTBLUE
15 - Blue Con NPCs - Default DarkBlue is lighter than CON_BLUE
16 - White Con NPCs - CON_WHITE
17 - Yellow Con NPCs - CON_YELLOW
18 - Red Con NPCs - CON_RED
19 - Target Color - Default Pink
Zeal Nameplate Font Choices and Drop Shadow option
The Zeal Nameplate tab now supports selecting custom "spritefont" formatted bitmap font files to choose which font your Zeal Nameplate has. Using this option turns off the normal Nameplate and replaces it with the Zeal Nameplate. There will be some variation in the location of the custom Zeal nameplate versus the client.
The Zeal Nameplate tab now offers a Drop Shadow option when using custom fonts for Nameplates. This option makes the font more visible by adding a black shadow behind the text.
A few sizes of arial font and arial_bold font are included with Zeal install and accessed through the options tab combobox. See above for notes on how to generate new fonts.
Creating your own Font
Below are steps for creating your own fonts, from the Zeal Readme:
Creating Fonts (advanced users)
Zeal advanced users can create their own fonts to use with Zeal in addition to those that come with zeal install. The custom created fonts can be used with the following Zeal features:
Floating Combat Damage, Maps, and Nameplates
Generation of new font files:
Zeal uses ‘spritefont’ files generated by MakeSprintFont.exe, a Microsoft windows command line tool.
https://github.com/microsoft/DirectXTK/wiki/MakeSpriteFont
Click on Downloads@Latest
Example command line: ./MakeSpriteFont "Arial" /FontStyle:Bold /FontSize:30 /TextureFormat:CompressedMono arial_bold_30.spritefont
Copy the new fonts to the uifiles/zeal/fonts folder
It will now be selectable from the combobox in game next time the options window is opened
Note: You will need to manually back up these fonts when updating Zeal if erasing the uifiles folder
Quarm.Guide Hosted Fonts
Here are some of Xanax’s favorite fonts. Currently rocking Segoe UI Bold 24. Download

This concludes After Installing the Game. Please proceed to Textures and Effects.